Saturday, July 30, 2011

Bookshelf Styling and A New Piece


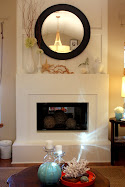
I was running errands in Carthage the other day and stumbled upon a great flea market. I had never been in so we decided to pop in and see if there was anything good. It was a pretty good one and I found some nice pieces....some candle holders, a small mirror, a small vase and this plaster architectural piece. It was a nice statement piece and a great size, just over 3 feet long. I knew just where I wanted to hang it.


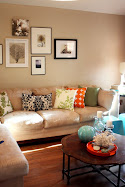
Just to give you an idea of where the bookcases are, this is a small wall just to the left after you walk in the front door. They are facing the fireplace. I keep referring to them as they because it's actually two of a kind that I have side by side. They have lived on this wall for a while, but I like the fact that I can break them up if I want to. They are each 32" wide and are just over 6' tall. They do a great job of balancing out the fireplace wall and fit well on a small awkward wall. The computer desk is adjacent to the bookcases and I use some of the lower cubbies for officey type things, but there is nothing wrong with mixing decorative living room items with functional office ones. When you live in a small space, you gotta do whatcha gotta do, right? :)
Back to the piece. I didn't touch the finish, this is exactly how I found it. It is made out of plaster and pretty heavy. I think I was drawn to it because of the egg and dart motif, I've always liked that detail.


I was thrilled when the finish was so close to the wall color, I knew I was hanging it above my bookcases and didn't want too much contrast with the wall color.I wanted the contrast to be with the bookcases themselves, so that was a great that I didn't have to paint it.


Well, you know how it goes, one thing leads to another, once I hung the new piece.....I had to clean and dust everything, which lead to a complete redo of the bookcases. The domino effect. :) It needed to be done anyway, I hadn't restyled the shelves for a while and it's nice to clean and freshen things up a bit.
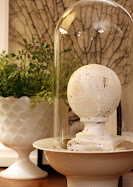


Shelf detail:


Look at my new little baby owl perched on a book. I found him at the flea market too. He might get a coat of spray paint, I'm not sure...I'm kinda liking him like he is.


The bookcases are so modern, which I love, but I also love how the new piece softens it up a bit. I typically have framed art up there (take a look HERE) but it was just more boxes on boxes on boxes. Once I had hung the new piece, I was happy with the decision.


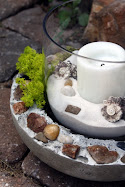
Of course one of my favorite things to do is mixing modern elements with rustic things, so I used a pair of glass vases (you've seen these on the mantle before), perched one on top of my painted pedestals, and my hourglass vase. I put moss in the vase and just love how that looks. Very simple.


I hope you're inspired to restyle your bookcases or built-ins! Thanks for stopping by!


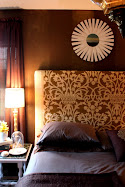
I'm still working on the master bedroom, if you read my fabric saga, you know where I am on that. I've ordered the "new" main fabric, so hopefully it will be here shortly! I hope I like it! LOL!

If you'd like to take a look at some more pictures take a look HERE.


UndertheTableandDreaming


Friday, July 29, 2011

Tommy Smythe And I Cried


So at the beginning of the year, our Master Bedroom was put on my goals list to get done. You know my whole goals for 2011, thing. {Throat clearing} Please don't remind me that it's the end of July and 2011 is rolling on by......


The room itself has been on the back burner for years, I piddle in there from time to time, a project HERE, a project THERE, but finalized? Nope. Which is why it made it onto the goals list in the first place. Get.it.done.Michelle.


Thanks to the wonder that is Pinterest, I have been pinning all sorts of inspiration pictures (wanna see? Click HERE). I am a big fan of Tommy Smythe's work so it was no surprise that I loved this room he did. This is a guest room in his home, I think I read that somewhere, you can correct me if I'm wrong....


I love the grass cloth walls, the mix of furnishings (and wood tones), the super big lamps, the touch of orange, cause you know I love orange, and the pillow with the pom-pom fringe. Yes, the pillow. I zeroed right in on it. Floral without being too girly, perfect colors, I needed black, orange and browns too, and who doesn't love pom-poms? To me, it is the perfect pillow oh, and Justin liked it too. I fell deeply in love with the fabric and I went to town tracking it down.


This is opposite the bed...


I did tons of googling, tons of reading, finally found out it was from Schumacher. So I spend a good healthy chunk of my life searching on their website for the fabric Tommy used. I couldn't find it anywhere. All I needed was a name, for crying out loud. Nothing. Out of desperation, I emailed Kirsten. I didn't think Tommy would answer my email(s). :) Thank the Lord she recognized it and sent me the link (thank you Kirsten!). I couldn't believe it, finally, my search was over. I promptly sat down, slapped my hands together, warmed them up, giggled a little, getting ready to write an email to Schumacher. I had it all planned out: I needed to inquire about the cost of the fabric and if I could pre-order.....I've got a doctors appointment in St. Louis in August and they have a showroom there, I thought I could just pick it up then. I was on the ball with this and really excited! This fabric was going to be the thread that tied everything in the room together for me. We are talking pom-poms here people! I was on top of the proverbial fabric world!


Well, I'm not a very patient girl when it comes to these sorts of things. I had emailed Schumacher over the weekend and I just didn't want to wait for a reply......I started thinking, since I have the name, color and sku number now, maybe I could find a source online and just have it shipped to me and won't have to wait till the middle of August.... man, I'm smart.


Just look at it, isn't it beautiful?


So I googled the name and color, got hits right away. Bingo! Click on first link.


I'm excited! I'm so....Wait a minute.


That says $151.20. Blink. Blink. Blink.


That can't be per yard, can it? Blink.


That can't be right, let me read the description.


Yes, here we go....100% Linen, Yes. 58" wide, nice. Unit of measure? Yard.


Yes. That's per yard.


Oh.


I was heart broken. I just hung my head and cried. The PMS wasn't helping, but I still think I would have cried either way.


Reality check. There goes my champagne taste on a beer budget again! All that work for nothing. I definitely got my hopes up a little too high and came crashing down. I'm pretty much over it now.... Although I whined to my MIL and even called my sister to share the news of the "fabric that got away". So what have I learned? Keep your options open!! :) I have found some other Tommy-esque fabric and even some coordinating....all in my price range and budget, but I'll never forget my first love. :) Oh, and Shumacher if you're reading, don't bother answering my email, I got my answer.


So do you have any stories about something you just loved, but it got away? Do share.


Images via Pinterest


Monday, July 25, 2011

How I Did The Chairs


Well thank you all for all the loverly comments on the new-to-me chair transformations, they are already a great help to our family, I didn't even realize how much we needed them! I wanted to get into the deets of how I did them. For the primer, I used Rustoleum Clean Metal primer. Yes, you read that right...primer for metal. Why? Just cuz. No. I'm kidding....I discovered metal primer covers all sorts of slick surfaces from ceramics to well, chairs. It covers like a dream. You'll see. I get it at Walmart and it will be next to the 'Rusty Metal' primer, don't get that, get 'Clean Metal' primer, it's white. For the paint I used Valspar Gloss white. Have you seen that Valspar has a line of spray paints at Lowe's now? It's not a super new thing, I just think it makes sense, I use the Valspar line of paints often and now I like the spray paint too. I'm glad they've dabbled in the spray paint realm. If you are a spray paint fanatic like me, go check out all the different colors.


I considered buying a paint sprayer, but honestly, I just don't paint enough furniture to justify the expense. I did invest in a spray paint handle though, this baby is a gem! It was practically like using a sprayer! This really saved my hands, I think it was under three dollars. I highly recommend grabbing one.

Now typically I'm a Krylon girl, all the way, but this is a little different than spraying my latest knick knack. These are chairs that will be used, moved, hit, scraped, kicked, knocked over, dragged, jumped in, etc, because I live with a bunch of heathens boys. They are rough on furniture, especially that little one. I have used the Valspar spray paint before and noticed that the finish seems thicker, for lack of better word. It says that it is quick drying, I have to disagree with that....compared to Krylon, it took twice as long to dry. But that's ok, in my opinion, I traded dry time for durability. Oh, and look at the shine. That's what I was after. It says it has the 'perfect finish', I do agree with that.


On to the seats. The foam on the existing seats were pretty wimpy so I wanted to add some foam to beef the seats up. I bought the foam at Hobby Lobby, but I saw it at Walmart as well. I bought the 1" roll of foam and cut it out using the wood as a template.


I used linen to cover the seats in an oatmeal color. It's neutral but has lots of personality with texture. The only real challenge is making sure it is straight, but it wasn't too bad. I used the original fabric as a pattern and used a staple gun to attach. The corners were a bear...I tried to get them as neat and straight as I could and stapled a lot.


The piping, for me, made this project really special. I use a lot of green and when I found this fabric, I was really excited to figure out how to incorporate it with the chairs.
However, out of everything....this was my problem area. See, I'm not a seamstress. There is a reason why the word STRESS is in the word seamstress, because it can be stressful!

At first, I cut the green fabric on the bias. After doing some research I found that fabric goes around corners better if it is cut on the bias, so that's what I did. Plus, I thought the weave of the linen would be contrasted beautifully if the piping was biased. So I cut all my fabric, joined all the ends together, and proceeded to sew the piping.

Problem. The fabric kept twisting...it wasn't smooth, and was not tight around the piping. I was sick to my stomach not to mention mad. I did some more research. Found out that I should be using a piping foot on my machine. Along with doing research, I emailed Suzanne. She suggested that I might be pulling and stretching the fabric while sewing, causing it to twist. Well, I didn't want to invest in a piping foot (30.00) for a little bit of piping for six chairs. SO. I decided to re cut all the fabric NOT on the bias. Don't worry, I've come up with an idea to use up all of the fabric I didn't use...So here is how I sewed the piping, not on the bias, and with a zipper foot. :)
Cut 2 1/2-3" of fabric:


Fold piping into the center of the fabric and slip under zipper foot:


I found that letting it sew a little on the angle got it tight enough. With the fabric just cut (not on the bias) there was no stretching and the fabric didn't twist.


To attach the piping to the seat, I used the staple gun, right over the linen. I started at the back and stapled around. I used my hand to feel the edges and flipped it over every so often to make sure it was looking good.


And look at this, the corners turned just fine! The bias cut wasn't even needed anyway! Although, I am trying to stop being so anal about the piping weave and the linen weave not contrasting like I wanted...I know no one would have noticed but me! :)


It turned out great and I love how it gave it a really finished look, and of course a great pop of color.


I was concerned about getting the piping to fit around the arms on the captains chairs, but it was completely fine! I just had to push it down a little bit and it looks really natural.


The groove in the wood looks like it wanted some piping! :)

Thanks so much for stopping by! If you have any additional questions, let me know in the comments.


6 Chairs...........Goodwill
Spray Primer.......Walmart
Spray Paint...........Lowe's
Spray Paint Handle...............Lowe's
Cotton cording for piping......Walmart from Wrights


Foam..............Hobby Lobby
Linen..........Fabric.com (click HERE)
Green Fabric...........Walmart


Did you miss the 'Before' pictures? Click HERE.

Wanna see a video on creating piping with a piping foot? Click HERE.


Wednesday, July 20, 2011

Chairs Are Done!


Well, without further adieu....the chairs are DONE! And so am I. The rest of the fabric arrived and I got busy finishing with the recovering of the seats and the piping. I think they turned out great, but not without some stress, frustration, and the worst: waiting. ;) I feel like I did right after I painted the kitchen cabinets...

Definitely a labor of love.
So here are a few before shots. Clearly, a dated set of dining chairs. A weird mix of dark stain and natural caning. The caning might have had a clear coat, but that's about it. The seat covers were original, and originally yucky.
When I saw them at the Goodwill, I hesitated, I knew they were going to be a big job and would take me a while, my stamina is still not built up since my surgery. I didn't rush, because when I rush I get overwhelmed, but on the other hand, I didn't want to look at these ugly beasts too long!


I took some real time deciding whether to paint or not. In the end, I didn't like how the wood of the table and the wood of chairs didn't jive, so finally I decided on a glossy white for the chairs. The table is a beautiful walnut, and the chairs; not so much. I love the look of white paint and wood, don't you? Plus, with the upper cabinets in the kitchen painted white, painting the chairs balanced out the whole area. I know it's hard to tell, but the kitchen and eating area are both one space. Dining/eating on one end, kitchen on the other.


Here they are with their shiny coat of glossy white, 100% linen for the seat covers and a wonderful shade of green for the piping. Once I was done doing the Kitchen Facelift, I used green, as an accent color and I have just loved it.
See how great the wood looks with the white?


Doing the piping was trial and error (heavy on the error), I've never actually done this before, but I'm working on a post that will explain how I did everything, including sources.


Anyway, I'm going to hush up now and let you enjoy the pictures. I still can't believe they are done!


Want to see more pictures? Click HERE. Stay tuned, I'll have the behind the scenes post and pictures ready soon!


UndertheTableandDreaming


Furniture Feature Fridays