Saturday, October 29, 2011

New Wreaths in the Shop

Happy Halloween weekend! Can you believe that November is upon us? Dare I mention Thanksgiving and Christmas! As fast as the holidays are approaching, I don't mind, this is my favorite time of year.

I've been busy stocking my Etsy shop in anticipation of the holidays and will be making even more!
I hope you enjoy and thank you so much for your support!


If you click on the link below each picture it will take you to the listing.

Cornucopia Wreath

Cornucopia Wreath

Berry Wreath with Plaid Ribbon


Snowy Wreath

Fruit Wreath
Poinsettia Wreath

Have a Happy Halloween!


Need a design boost? For advice and guidance on style, contact me!

Wednesday, October 26, 2011

Harvest Green Tablescape

It is that time of year when I get inspired just by being outside. I love all the changing leaves and wonderful saturated colors, definitely a perk to living in Missouri. While we were taking pictures over the weekend, we were in an area with several hedge apple trees. I just love the color and texture of them....and decided to bring a bunch home.

The centerpiece I created is really simple. A large cylinder vase (I've used these a million times) filled with water, submerge the hedge apples and placed cut branches. Super simple, high impact.


I placed the vase in the galvanized tray I've had (I've used that tray here and here too) and layered in the rest of the hedge apples. It was so cute Logan kept calling them head apples. :)


Isn't the texture wonderful?


The table that Justin built for me last year has really weathered well, it is a lot lighter, which I am loving. You can't beat the look of weathered wood, you really can't. For the place settings, I started off with place mats I made from burlap (you might remember them from here). Leaf charger plates from Walmart last year (they have a similar version this year too ) and a plain white dinner plate


The glassware, simple, and nothing new ( I really do need to add glassware to my list).


For utensils, I decided to use some of the giant set that I won at auction, I think the gold adds a lot of elegance. The handles look great with the charger plates.


The salad plates are from Walmart, really inexpensive and look really great. I loved how the little bit of green ties back to the hedge apples.


The napkins I found at World Market and they have them in a ton of colors, this one is called celery. The napkin rings are thrifted but I didn't find them this way. They were originally a wooden look but I white washed them for a new look, this is actually the first time I've used them.


SO just out of curiosity, do you call them Hedge apples or Osage oranges?


Thank you for stopping by! I hope you are inspired!


Want to see more pictures? Click HERE


Joining Susan


Need a design boost? For advice and guidance on style, contact me!

Tuesday, October 25, 2011

DIY Paint Technique (New Version!)

You probably know by now that transforming accessories with paint is one of my favorite things to do. If it's a great shape, or figure in this case, that I love, I KNOW it can be salvaged. Are you ready to learn a new painting technique? I was wanting to try a different look and color that is a little darker than what I showed you this past spring, I guess to go along with the season......so let's go! It's easy!

What You'll Need:


Figurine, statue, or some accessory in need of some TLC


Clean Metal Primer (this works great for ceramics too!)


Territorial Beige (or some form of tan/beige)


Burnt Umber


Gnarly Brush
Spray Sealer in Satin (or flat if you prefer)


Meet Quail. He is old and crying out to be brought to the 21st century! He is pitiful, but potentially pretty.


I gave him a coat of primer and let it dry.
(Hey, if you're into the mod look, after the primer, give him a couple of coats of glossy white and call it done. I like that look too.)


Follow up the primer with two coats of territorial beige, and let dry.
Make sure you get Quail's belly.


Here is the brush that I use for dry-brushing on small projects. It is an artist brush that has been through the ringer a couple of times, but one of my most used brushes. I suggest using a smaller brush because you have more control over where the paint is going, but a small 1 inch chip brush will probbaly do the trick too, you'll just have to make sure that it isn't layered with too much paint.


Burnt Umber is probably one of my favorite paint colors. It is the perfect brown. So while you have some wiggle room on which tan/beige to use, I urge you to use only burnt umber for the top coat. So start off slowly and build up the layers of paint, you'll want the beige to show through quite a bit. I probably went over the bird twice before I felt it looked right. You'll know when it's done.


Here is Quail all finished, but looking rather dull, so on to the next and final step. Is this easy or what?


Give Quail two coats of a satin polyurethane. That sheen really brings out the color and isn't too glossy. He's looking mighty happy and handsome now!


Here is another sampling of the technique, this time on an over-sized pear (I love this too!!) The technique works even if you don't have raised surfaces too. It did take a little longer to get it just right, but it was worth it!


And then I was REALLY happy with the outcome of this one. This one did take some time. But you can't beat the before and after


1980's Ceramic Fruit Topiary Before:


Timeless AFTER:


All three of these pieces I bought to go in my booth, but I think the quail might have to stay with me for a while (and the pear too!) :)


I hope you have a fresh perspective on old and tired accessories, paint them!

This technique is really easy, give it a try!
UndertheTableandDreaming


Domestically Speaking


Need a design boost? For advice and guidance on style, contact me!

Monday, October 24, 2011

Moustaches For Fall

Do you like taking seasonal pictures? I am a little anal about it. I like to "go take pictures" for every season, to document each season (year) of our lives. The kids are growing up SO fast (and I seem to be 'growing' too:) and I love looking back on each year. I don't scrapbook as much as I use to, but I still like having all the pictures.

Picture taking is not a chosen activity of my small brood of men, I have to do a little sweet talkin' with the bigger ones like: "I won't bother you the rest of the day......" and " You can go to the mall after we are done...." and for that little one, it's a little easier....."Yes, you can bring Mickey Mouse."

This year, and I don't know why I haven't tried it before....funny props and in this case; Moustaches! I seriously made these 10 mintues before we left out of black cardstock and skewers.
Is this not hilarious??

Lord help me, he's got {real} facial hair.

This one just cracks me up.


Of course I had to get in on the fun too.


Justin was game too.

The moustaches were a lot of fun and all the guys were enjoying 'taking pictures' and it made all the difference.
Keegan is taking pictures for me here.


Thanks for stopping by! I hope you are inspired to get out and take some pictures!


Need a design boost? For advice and guidance on style, contact me!

Saturday, October 15, 2011

Halloween Mantle 2011


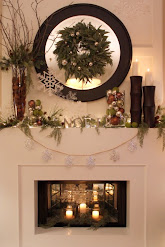
Hallow's Eve is fast approaching and I finally got around to doing some spookyfication around the living room. This years mantle look similar to last years, mainly because, um, well, I'm using the same stuff...but I did change it up a bit and I hope you're inspired!


Hopefully you remember the painted pumpkins, well two of them never made it out to the porch. I decided to use them up on the mantle instead (I really loved the b&w ones!:).


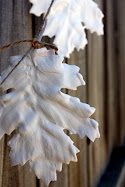
The two tall white vases I've had for years are perfect for permanent leaves and real branches. For a fun addition I printed some Halloween images (from the Graphics Fairy) onto book paper and randomly hung them on the branches (I just poked the branches through the paper). Cheesecloth spiderwebs really add to the spooky effect.


I get a lot of questions about my owl silhouette. I got it years ago at TJ Maxx and I have never seen another like it or even similar. I really wish they would make them again.


For the chair, I just used a white knit blanket to give it that 'ghostly' look, so easy to do.


To finish off the mantle, I clustered several in the center, repeating the candles in the fire box...you'll see it all lit below.


The Trick or Treat banner if from Martha Stewart Crafts


I love my little collection of pumpkin men, they come out every year


This is my fave. :)


If you liked the pumpkins on a stick, I made a different size, this one is a glittered one inch pumpkin on a stick, so cute!!


This was a new piece for this year, I found him at Home Goods. Since I've got a thing for owls, he certainly made it home with me! I think the little white owl behind him is a little jealous. :)


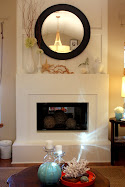
And since a Halloween mantle wouldn't be right without some evening shots with all the candles lit.


This is a non-working fireplace, so I love having the candles in there, nothing earth-shaking, but I still like the look. I used a combination of tealights and column candles. I get questions about the mirrors in the background, I bought four inch mirror tiles and hot glued them to the inside of the fire box. A non-permanenet solution to an ugly fire box.


A spider crawling across my book of Shakespeare which happens to be opened to Macbeth...Double, double, toil and trouble fire burn and cauldron bubble.......:) Love it.


I hope you are inspired !


I'll be back next week!


Get the look:


Home Stories A2Z


Need a design boost? For advice and guidance on style, contact me!